Configuring IPv6 Version of FRP for Internal Network Penetration
Using IPv6 server for FRP penetraion.
Requirements
When setting up FRP for internal network penetration, I have a server at home with only a public IPv6 address.
Additionally, I have a client within the internal network. The goal is to establish internal network penetration using the public IPv6 server as a relay.
Reference Materials:
[1] GitHub Project Issues, “Accessing via IPv6 #111”
[2] GitHub Project Issues, “How to Configure Both IPv4 and IPv6 #733”
[3] GitHub Project Issues, “Does FRP Support IPv6? #2634”
[4] Official Documentation of FRP
The first three references [1-3] are discussions about FRP, and the last one [4] is the official documentation, which may be helpful for those who have never configured FRP before.
Prerequisite Knowledge: How FRP Works
If you’re already familiar with FRP, you can skip this section and proceed to the next step.
FRP is mainly used for internal network penetration.
For example, if you have a client that you want to access but cannot reach it directly over the public internet due to reasons like no public IP or firewall restrictions, yet the client itself can access the internet, then you can use a server with a public IP as a relay. This allows you to access the client through the relay server.
The basic working mechanism is shown below:
This is the simplest setup. As shown in the diagram, when you interact with the client, the traffic still passes through the server, which could increase bandwidth pressure on the server.
However, FRP now supports XTCP, which allows P2P communication by deploying frpc on the user’s side. However, this guide does not cover XTCP, since I don’t need it for now.
Configuring frps for IPv6 Mode
First, ensure that both the server and the client support IPv6 access and DNS resolution. This guide does not cover IPv6 network setup.
Currently, FRP fully supports IPv6. The main modifications are:
- On the client side, set
server_addrto an IPv6 address. - On the server side, set
bind_addrto listen to IPv6 local addresses.
For example, I have a domain name summer.114514.love, so the configurations should be:
1
2
3
4
5
# --- frpc.ini --- on client --- #
server_addr = [summer.114514.love]

# --- frps.ini --- on server --- #
bind_addr = ::
Why Use a Domain Name?
Since IPv6 addresses change frequently, it is recommended to bind a domain name.
For reference, I wrote another guide on setting up IPv6 DDNS using Cloudflare DNS.
Other settings remain the same.
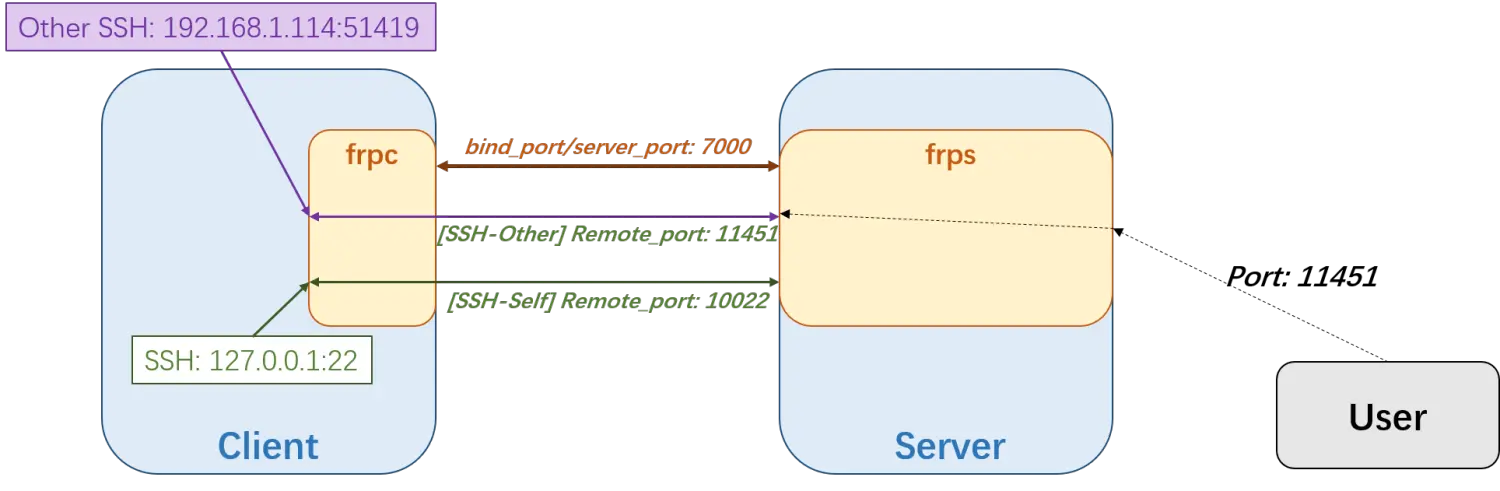
Assuming our setup goal matches the previous diagram, the configurations for the client and server would be:
frpc.ini (Client Configuration)
1
2
3
4
5
6
7
8
9
10
11
12
13
14
15
16
17
# --- frpc.ini --- on client --- #
[common]
server_addr = [summer.114514.love]
server_port = 7000
token = nnnaaaAAAA!!!!

[ssh-self]
type = tcp
local_ip = 127.0.0.1
local_port = 22
remote_port = 10022

[ssh-other]
type = tcp
local_ip = 192.168.1.114
local_port = 51419
remote_port = 11451
frps.ini (Server Configuration)
1
2
3
4
5
6
7
8
9
[common]
bind_addr=::
bind_port = 7000
token = nnnaaaAAAA!!!!

dashboard_port = 7500
dashboard_user = senpei
dashboard_pwd = 1145141919810blacktea
enable_prometheus = true
Notice that:
- The configuration logic is the same as in IPv4.
- Ensure that both sides use the same token for authentication.
Connecting via SSH
When using the setup, you can connect to the client through the server using any protocol. For example, in my case, the server is a Raspberry Pi at home, which only has a public IPv6 address and no public IPv4 address.
Assume its internal network IP is 10.19.19.114, then from within the same network, either of the following commands will work:
1
2
ssh senpei@summer.114514.love -p 10022
ssh senpei@10.19.19.114 -p 10022
Additional Considerations
If, like me, you’re running the server at home, make sure to adjust your router’s firewall settings to allow access to the necessary ports.
That’s all!